Nutanix Deployment with VMWare VSphere (Part1)

In This series will discuss the Nutanix with VMWare VSphere from A to Z. Starting from New Cluster Deployment, VSphere Configuration and last not the least Migration.

Foundation is official deployment software of Nutanix. Foundation help to configure pre-imaged or reimage the nodes with the required hypervisor and AOS. Foundation can give the option to create cluster or skip the cluster formation.

Foundation can be download from Nutanix Support portal.

https://portal.nutanix.com/page/downloads?product=foundation

Foundation software is available for

  • Foundation for windows
  • Foundation for MacOS
  • Standalone Foundation VM

Beside Foundation we required desire AOS bundle & Hypervisor ISO (if we are not going with AHV)

In Today’s walkthrough will use Foundation for Windows to do the foundation. Once Foundation Application is installed. Run as admin foundation.exe

Before proceeding with the foundation, some of the keypoints need to be noted. I would recommend the flat unmanaged switch and connect all nodes shared network ports and laptop on the switch.

You can check the shared port information from hardware compatibility list.

https://portal.nutanix.com/page/documents/list?type=compatibilityList

incase if share port is not available we need to connect IPMI & ethernet ports from each node.

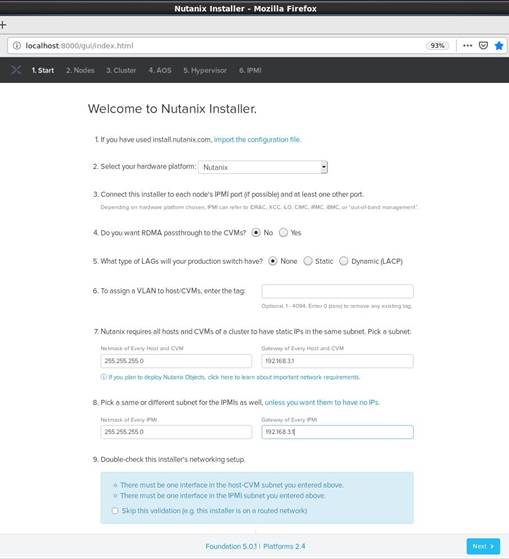
Select the hardware platform type, Provide CVM & IPMI Subnet and Gateway IP. Click Next to Proceed.

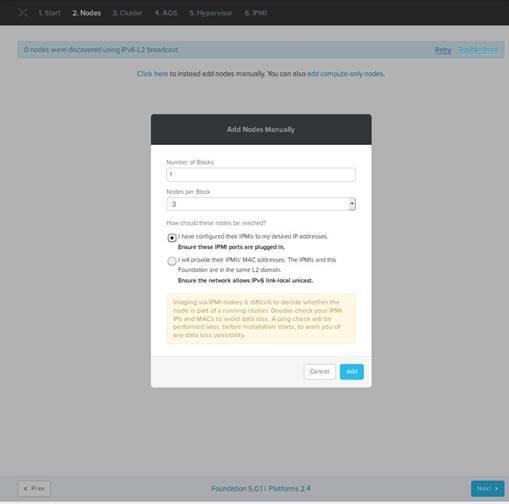
Provide each Node’s IPMI, HOSTIPs, CVM IPs and hostname and click Next.

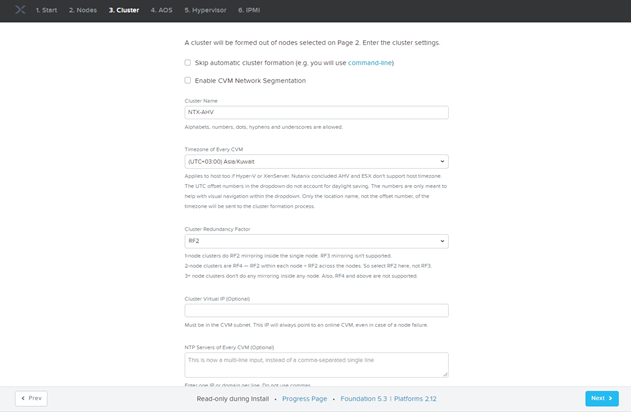
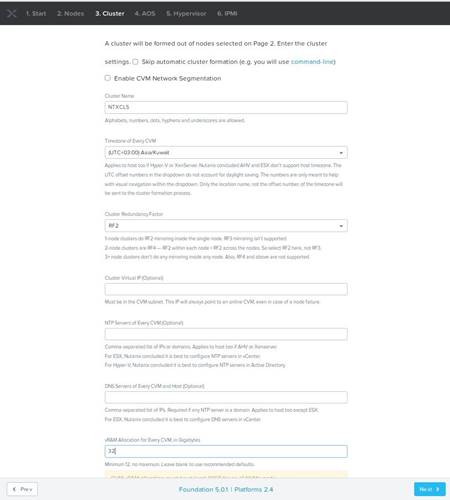
Provide Cluster Name, Specify Time Zone & CVM Memory and Click Next.

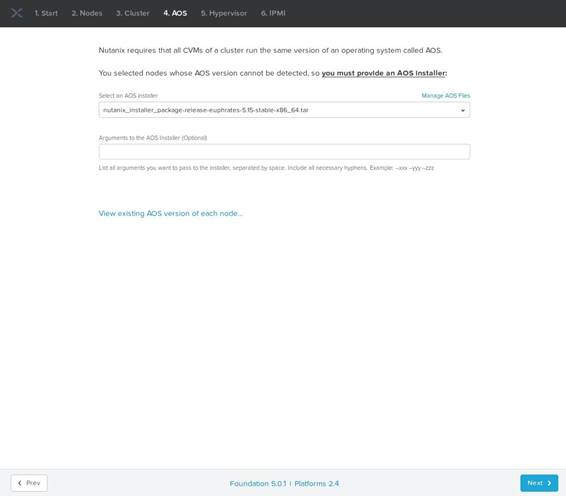
Provide AOS Bundle and Click Next

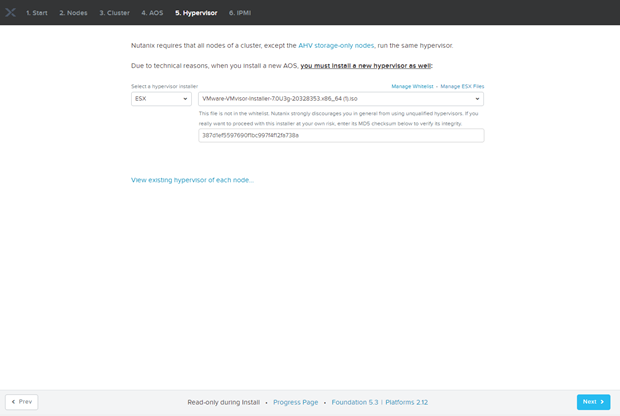
By default AHV is bundle within AOS Package, as I want to install VMware ESXI as hypervisor so we need to provide VMware ESXi ISO.

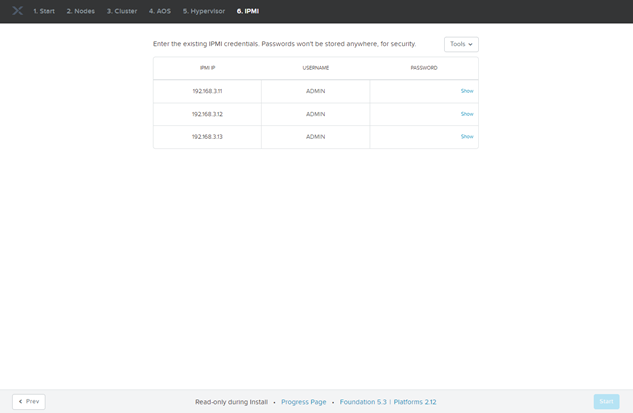
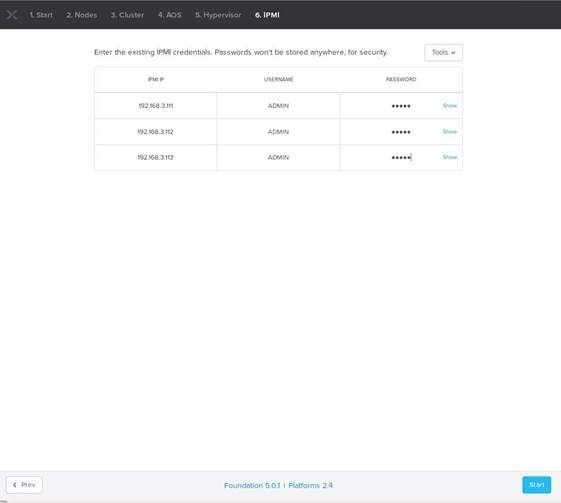
Provide IPMI Credentials and Click Next

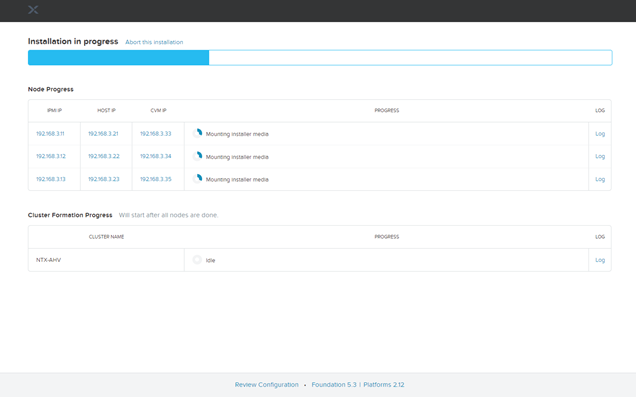
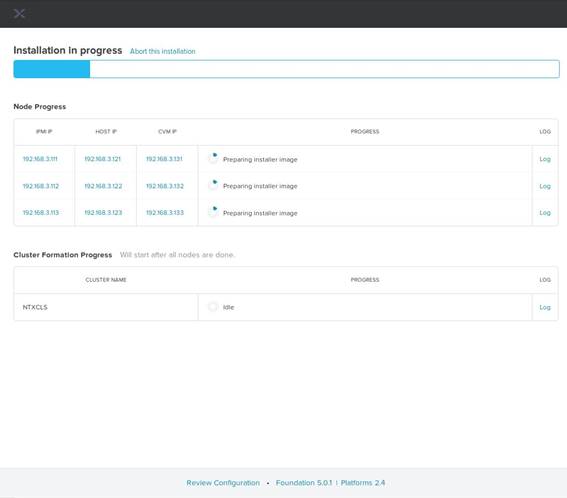
Foundation Process will take approx. 1hrs.

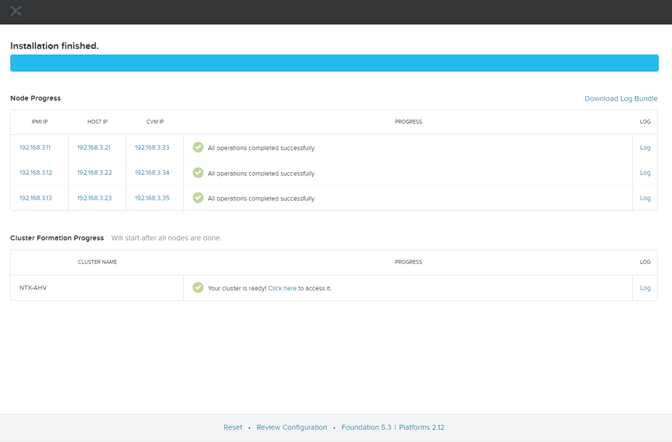
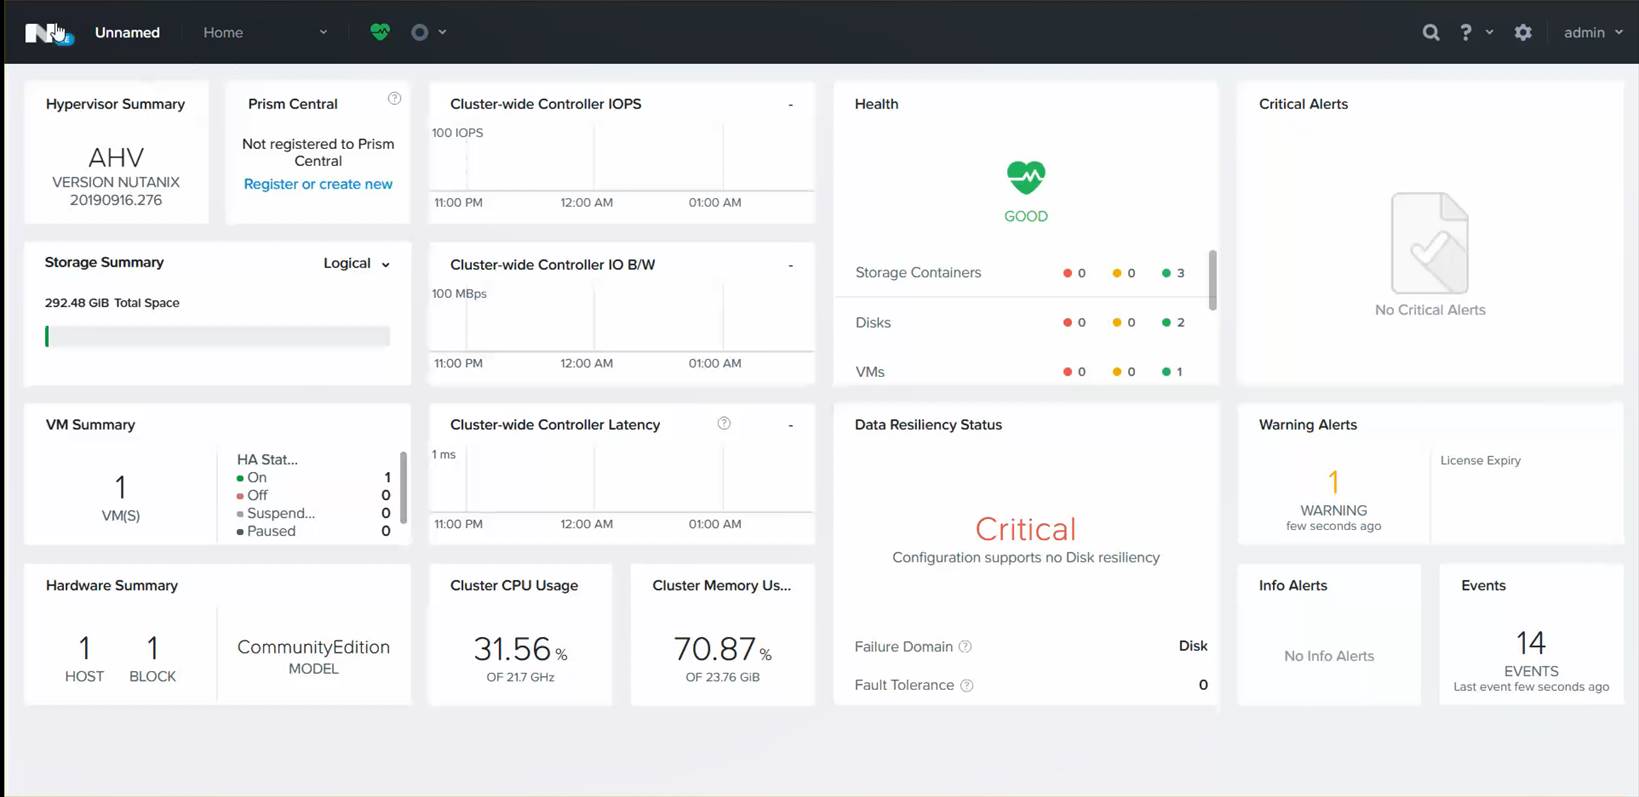
Foundation is finished. You can access the prism from any of the CVM IPs.

Default Credentials are as below:

User Password
CVM nutanix nutanix/4u
Hypervisor root nutanix/4u
Prism admin Nutanix/4u
IPMI ADMIN Node Serial Number

Setting-up Single Node Nutanix Community Edition Cluster

Nutanix Community Edition is the Free version of Nutanix OS which can be used to test drive the main features of Nutanix, it can be deployed on existing hardware in the infrastructure or in the Virtual Machines

Nutanix CE Components:

  • AHV (Acropolis Hypervisor )
  • Nutanix Prism ( Nutanix Management Plane)
  • nCLI
  • Single or Multi-Node Cluster

Nutanix CE Limitation:

  • Internet Access on the Cluster
  • Nutanix Next Account for activation
  • Must upgrade within 30-Days or once the upgrade is available

Let’s start with the setup by step hand-on

  • Download the Nutanix CE Binaries from Nutanix Portal

Browse Nutanix Community link

Download Nutanix CE Installer ISO. Once installer downloaded we can proceed with the Virtual Machines creation.

Proceed with the Typical VM Creation and click next.

Browse the Nutanix CE Installer and Click Next

Select CentOS 64Bit as OS and click next

Specify the VM Name Click Next

Specify the disk Size and click Next

Review the VM Hardware setting & add additional 2 HDD ( 1 for Hypervisor, 2nd for CVM, 3Rd for DATA) and Virtual Machines memory should be at-least 24G.

Power -On the VM and boot VM from ISO Installer

Specify the desire Hypervisor, Select the VM disks as per the requirement and Specify the IP Address details for Hypervisor & CVM and proceed next.

Accept the license agreement (Make sure to scroll down the license till end) and start the installation.

Installation will take approx. 30-40 mins, once installation completes disconnect the installer ISO and press Y to reboot the VM.

Once the VM boots, you can see Nutanix Prism is accessible, below are the default user name & Password for Nutanix

  User Password
AHV Root nutanix/4u
CVM Nutanix nutanix.4u
Prism admin nutanix/4u

Enter the Nutanix Next account and click à , incase if you don’t have the Nutanix next account you can create one.

Cluster is register and page will be redirected to home page

Initial Cluster setup is completed, enjoy Nutanix Simplicity 😊


Nutanix AHV VLAN Configuration

CVM & AHV host should be on the same VLAN, by Default CVM & AHV Hosts are untagged and shown as VLAN 0 placed as native VLAN.

Assign VLAN on AHV Host:

  • Login to AHV host using root account
  • Put the host & CVM into maintenance mode
  • Assign the port br0 to VLAN

root@ahv# ovs-vsctl set port br0 tag=host_vlan_tag

Replace host_vlan_tag with the desire VLAN ID.

  • Confirm VLAN tagging on port br0.

root@ahv# ovs-vsctl list port br0

  • Confirm the tag parameter

Assign VLAN on CVM:

  • Login to AHV Host using root account
  • Login to CVM

ssh nutanix@192.168.5.254

  • Assign VLAN to public interface for CVM

change_cvm_vlan vlan_id

  • Replace vlan_id with the desire VLAN ID.
  • Restart the network service
  • sudo service network restart

Tips:

  • Nutanix Recommend to configure CVM & Host VLAN as native VLAN or untagged, as New nodes send and received untagged traffic. If tagged VLAN is used VLAN must be updated on the new Nodes before adding new nodes.

Nutanix Bare-metal nodes Foundation

Nutanix Bare-metal nodes Foundation

Nutanix Foundation is the process to install Hypervisor & CVM on the Nodes.

Bare Metal Imaging can be performed from workstation with the access to Shared port or IPMI and Network ports on the node. Imaging a cluster required Nutanix Foundation & AOS Binaries.

  • AOS Binary
  • Foundation Software (anyone of below can be used to do the foundation)
    • Foundation VM
    • Foundation for Windows
    • Foundation for MAC

You can download the foundation & AOS Binaries from Nutanix Support Portal à Download à Foundation / AOS

Prepare Workstation for Foundation.

Multiple option is available for Foundation, Foundation for Windows can be installed directly on Windows Laptop connected with Nutanix Nodes or Foundation VM can be imported in VMware Workstation / Oracle Virtual Box.

In this article I will proceeding with the imaging with Nutanix Foundation VMs.

Installing the Foundation VM

  • Start Oracle Virtual Box / VMWare Workstation / Foundation
  • Click the File menu and select Import Appliance… from the pull-down list.
  • In the Import Virtual Appliance dialog box, browse to the location of the Foundation .ovf file, and select the Foundation_VM-version#.ovf file.
  • Click Next.
  • Click Import.
  • In the left pane, select Foundation_VM-version#, and click Start.
  • If the login screen ask for password, Foundation VM password is Nutanix/4u
  • On the desktop you can find the set_foundation_ip address script to set the foundation VM IPs
  • Once IP set, we are ready to do next stop

Copy Installation files to Foundation VM

Copy the Nutanix AOS Binaries (nutanix_installer_package-release-euphrates-X.XX.X.tar.gz) to /home/Nutanix/Foundation/NOS directory. Copy the hypervisor ISO to as below

  • ESXi ISO image: /home/nutanix/foundation/isos/hypervisor/esx
  • Hyper-V ISO image: /home/nutanix/foundation/isos/hypervisor/hyperv
  • AHV: AHV is bundled with the Nutanix AOS package

Launch Foundation Applet

  • Double click Foundation Applet, to start the foundation


  • Select the Block hardware, CVM, IPMI Netmask and Gateway and click next to proceed.


  • Click retry to discover the Nutanix node, currently new Nutanix Block comes with the discoveryOS so nodes are discoverable from Nutanix Foundation.
  • As my LAB nodes are old one so I am proceeding with the manual add


  • Specify the Number of Node per Block, Select how these nodes will be reached
    • I have configured the IPMI as my desired IP Address
      • This option is good if IPMI IP Address are already set
    • I will provide the IPMI MAC Address
      • This option is used to avoid setting up the IPMI Address manually, NODE IPMI MAC Addresses are mention on the backside on each node.
  • Click Next to proceed.


  • Specify the required IP Address (IPMI, CVM, HOST) , Hostname and click Next


  • Specify the desired Cluster Name, Time Zone , Cluster Redundancy Factor, memory for CVM and click Next.


  • Provide the AOS installer and click Next.


  • Select the Desire Hypervisor and provide the Hypervisor ISO for installation. AHV is already bundled with AOS package. For Hyper-V & VMWare ESXi, whitelisted ISO need to provide before proceeding.


  • Specify the IPMI username/password and click Start


  • Foundation will validate the IP Addresses and proceed with the installation.


Tips:

  • IP ver6 need to enable on the Laptop for the discovery
  • Incase Symantec Endpoint protection is installed on the Laptop, disabled it even if you using the foundation VM as I saw Symantec Network Threat Protection is even blocking the Foundation VM Traffic
  • Always use latest version of Foundation Software
  • Use Flat Switch during the foundation

Happy Foundation 😊

Nutanix University – Summer School Savings :)

Brush up on your Nutanix skills this summer, and get certified too! For the next two months, anyone who completes one of the following FREE online courses will also receive a FREE certification exam voucher.

Eligible courses:

  • Enterprise Cloud Administration
  • Nutanix Data Services Administration
  • Nutanix End User Computing Administration
  • Nutanix Database Administration

This is a great opportunity to build out your Nutanix skill set at no cost.

What are you waiting for? Get started today!

Terms and conditions

  • Exam voucher will be assigned to student via their learning plan within 24-hours after the completion of the course
  • Course must be completed and exam voucher redeemed by July 31, 2021
  • Exam voucher code can only be used once
  • Student will receive one (1) exam voucher for each completed online course from the list above

Enjoy 😊 Happy Learning

Nutanix LCM Error: Foundation Service Running on one of the Node, Test failed

LCM Inventory is getting failed with the error “ Foundation Service running on one of the nodes, test failed

SSH to one of the CVM, and run below command to get the foundation service status

allssh ‘genesis status | grep foundation’

nutanix@NTNX-15SXXXXXXAAAA-A-CVM:192.168.1.10:~$ allssh ‘genesis status | grep foundation’

================== 192.168.1.10 =================

foundation: []

================== 192.168.1.11 =================

================== 192.168.1.12 =================

foundation: [14525, 14556, 14557]

================== 192.168.1.13 =================

================== 192.168.1.14 =================

As per the output, foundation service is running on one of the node( 192.168.1.12), ssh to the node where foundation service is running. And run the below command.

genesis stop foundation

nutanix@NTNX-15SXXXXXXAAAA-C-CVM:192.168.1.12:~$ genesis stop foundation

2021-02-17 13:15:16.382143: Stopping foundation (pids [14525, 14556, 14557])

Once genesis stop you can confirm it while running the command again.

nutanix@NTNX-15SXXXXXXAAAA-A-CVM:192.168.1.12:~$ allssh ‘genesis status | grep foundation’

================== 192.168.1.10 =================

foundation: []

================== 192.168.1.11 =================

================== 192.168.1.12 =================

foundation: []

================== 192.168.1.13 =================

================== 192.168.1.14 =================

Rerun LCM inventory, its running fine now

Enjoy 😊

Rubrik : How to Add Nutanix AHV Cluster

Rubrik Supports Nutanix AHV Backups. In the current Rubrik release configuring Rubrik AHV backup are like 5min job or piece of cake.

In today article I will show how to add Nutanix AHV Cluster in Rubrik as Backup Source.

Click on the gear icon à on the menu select Nutanix Cluster

On Right of Page click + icon to add the Nutanix Cluster

You have to provide the below information

  • Nutanix AHV Cluster IP
  • Cluster UUID
  • Cluster SSL Certificate
  • Prism Username / Password

To get the Nutanix Cluster UUID & Certificate , SSH to Nutanix CVM

Run Below Command to get the Cluster UUID

NCLI Cluster info

info

To get the Nutanix Certificate:

print ssl.get_server_certificate ((‘Prism Element IP’, 9440),ssl_version=ssl.PROTOCOL_TLSv1_2)

Click Ok to add the Nutanix Cluster. Once Nutanix Cluster is added you can proceed with VM selection and assign desire SLA.

Best Regards,
Qamar Abbas

Nutanix – Turn-off IPMI VLAN Tagging using IPMITool

Yesterday I faced an issue which took more 2-3 hour to get sorted. I had old Nutanix Block on which I need to do the foundation when I started the foundation using Nutanix Foundation VM and got error foundation process failed with error “ Unable to set IPMI IPs)

  • I tried to set IPMI IP on the Nutanix Nodes manually, but strange thing even after setting up IPMI IPs I was unable to ping the IPMI interface. I tried on Shared/ dedicated IPMI Port but failed.
  • The hardware I was using was old Nutanix Block from G4 Generation, and there was no other options in IPMI Menu in System Setup to modify except IP Address
  • I tried to login Hypervisor , but failed as I don’t have IP root password.

Moving forward, I got an idea make one bootable using download IPMItool from SuperMicro Website, boot the nodes from USB Drive.

  • When I run the IPMICFG tool and get the current VLAN Status, VLAN ID was ON on the IPMI interface. I turned off the VLAN ID.

IPMICFG -vlan off

Incase if you have access on the hypervisor IPMItool can be used to trun-off the VLAN ID, using below command to turn off VLAN Id from ESXi Host.

/ipmitool lan set 1 vlan ID off

Once the VLAN off, I am able to access IPMI ports and proceed with foundation.

IPMICFG Can be download from below link

https://www.supermicro.com/SwDownload/SwSelect_Free.aspx?cat=IPMI

How to Cancel Nutanix Stuck Task from Commanded Line.

Yesterday, I had initiated the AHV host restart task after reaching to 24% task got stuck, I wait for 1 hour but task didn’t move seems it’s got stuck. I tried to get the list using:

acli task.list

but didn’t get anything related to my task i am looking for, Finally found the solution using Egron Task manager Service. Nutanix Egron is the task manager that is responsible to start / kill the running, stuck task automatically or manually if needed.

Below are the steps to kill the running/stuck tasks.

Step 1: login to Nutanix CVM using SSH

Step 2: Get the task list

nutanix@NTNX-16SM65330119-A-CVM:XXX.XXX.XXX.XXX:~$ ecli task.list include_completed=false

Output:

Task UUID Parent Task UUID Component Sequence-id Type Status

6b2179c4-5459-474e-8521-637028e1418b Genesis 11 Hypervisor rolling restart kRunning

Step 3: Kill the desire task from the list

ergon_update_task –task_uuid='<Task UUID>’ –task_status=aborted

Replace the task_uuid with the Task UUID form Step 2. So the command will be as below

nutanix@NTNX-16SM65330119-A-CVM:XXX.XXX.XXX.XXX:~$ ergon_update_task –task_uuid=’6b2179c4-5459-474e-8521-637028e1418b’ –task_status=aborted

hopes this works incase if the TASK are not getting listed using acli / progress_monitor_cli

Attention: Above mention commands are irreversible, use it carefully if you are not confident better open the support case with Nutanix Support / local Nutanix Partner.

Just got a feedback from Nutanix Support Team, above mentioned taskkill can leads to serious issues please do not do it yourself, incase if any assistance is required please reach-out to Nutanix Support for the fix.

Restart Prism Service

Issue: Nutanix Prism Element Responding Very slow or not responding properly

Solution: I have encountered the prism each operation like VM Clone, VM update, VM Snapshot operation taking very long time or just waiting for menu to open. I have fixed the issue after restarting the Prism Service. Below is the solution to restart Prism Service

STEP 1:

Login to any CVM using SSH/ Console

Enter –> Curl Enter –> curl http://0:2019/prism/leader && echo

Above command will return the Prism Leader info.

Check if you are connected to same CVM otherwise connect to the leader CVM

Step 2:

Stop Prism Service

Enter –> genesis stop prism

Wait for few second till prism service stop

Step 3:

Enter — > Start Cluster

This will start the Prism Service again.

Ref: https://portal.nutanix.com/page/documents/kbs/details/?targetId=kA0600000008RwaCAE