Issue: Nutanix Prism Element Responding Very slow or not responding properly
Solution: I have encountered the prism each operation like VM Clone, VM update, VM Snapshot operation taking very long time or just waiting for menu to open. I have fixed the issue after restarting the Prism Service. Below is the solution to restart Prism Service
As all we know Nutanix Move is the great tool to migration Workload from Hyper-V, VMware and AWS to Nutanix AHV. Recently during one of migration project I faced once issue, One of the Migration Job stuck and I tried to abort the job from GUI but unable to do that. Below is the solution which I tried and its works.
login to Nutanix MOVE VM from Console/SSH
User: admin
Password: Default password (Nutanix/4u)
Type RS and enter
Now you have Elevated access on OS like a Root User. Connect to POSTGree database
STEP 1:Open Postgres-shell
Postgres-shell
psql -d datamover
STEP 2: List available Migration Plan with using below command
select mpuuid,name from migrationplans;
Step 2: locate the migratoinplan and the run below last command to delete the migrationplans (Replace ID with desire migration mpuuid you get from Step 2)
delete from migrationplans where mpuuid=’ID’;
Hopes its work
Attention: Above mention commands are irreversible, use it carefully if you are not confident better open the support case with Nutanix Support / local Nutanix Partner.
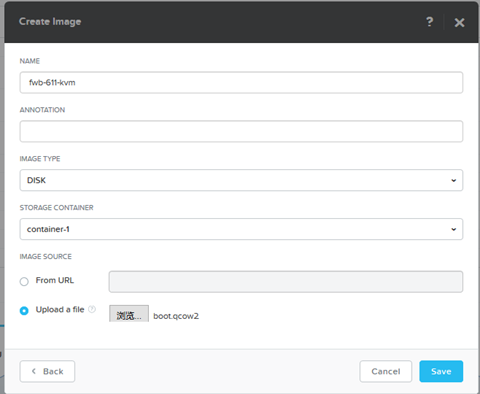
The Image service allows us to import Disk Images & ISO or disk type supported in Hyper-V & VMware directly in AHV Virtualization Management. Some of the supported formats are .qcow2, vmdk, VHD, raw, vdi, iso.
We can import the disk images directly using prism UI from Http / NFS Source.
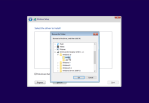
Prism à Gear Icon à Image Configuration
So the imported images will be available in repository for future use. Any prism user with permission can spin up the VM based on available images in images repository.
Note: Before importing Images to AHV, install VertiO to avoid VM boot failures.
Why we required Images:
We can use disk images as temple, like install OS with latest patch and import it in Image service for future Use. Next time we can directly add bootable disk to newly create VM.
Attach data disk to other VM
Create Image using existing vmdisk Attached to VM:
To create the Image using existing vmdisk, we have to use acli. Login to any CVM using SSH.
vmdisk UUID: vmdisk UUID you found using vm.get command
Target Container: Where you want to create new Image
Create vmdisk using available Images in Image Configuration:
Use Prism GUI > VM >Create new VM/Update existing VM. While adding disk, select “Clone from Image Service” and select the desire image and add the image as disk.
Nutanix Xi Frame Desktop as A Service Platform Build for Cloud Deployments, having integration ith Azure, AWA, GOOGLE Cloud. But we can deploy Frame on-Prem on Nutanix AHV. In this Series I show the Nutanix Xi Frame Deployment on on-Prem Nutanix AHV.
Requirements:
Nutanix Cluster Running with Acropolis Hypervisor with Prism Central 5.10 or newer
Frame Agent and Cloud Connector Appliance (Download from here) Cloud Connector Appliance can be downloaded automatically during deployment also
Xi Frame Subscription
STEPS:
Create Golden Image
Prepare Nutanix Cluster
Connect to Xi Frame
Create Golden Image:
Now I will Install windows 10 & install Frame agent on it and then Sysprep the image.
Create VM on AHV:
Open Prim Element & Navigate to VM
Click Create VM to Create Virtual Machine
Assign VM Name, VCPU, RAM, Storage, Network and mount Windows 10 ISO , VertIO
Note: VertIO Is required to Install Window on AHV Hypervisor as Window 10 does have Nutanix ISCSI pass through Drivers
Click Save to Create the VM.
Power-On the Created VM.
Click Install to Proceed with installation
Click Install Now
Select Desire Language and keyboard options and Click Next
Select Operating System Version and Click Next
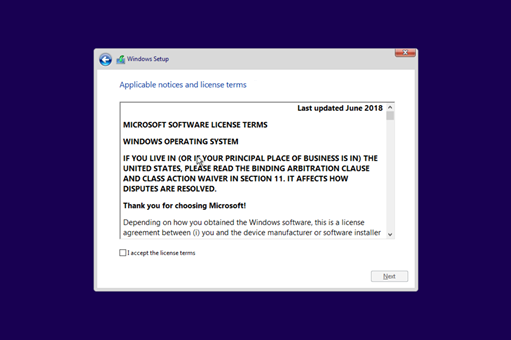
Accept the Agreement and Click Next
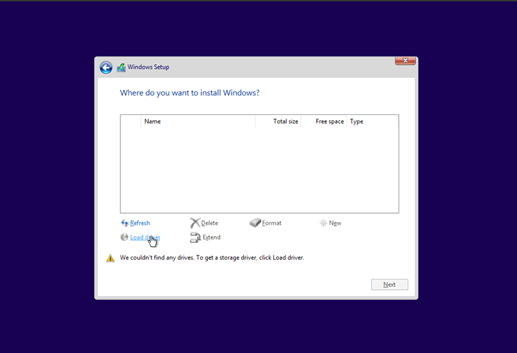
As Disk is not discovered, click load driver.
image007
image008
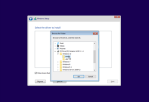
Browse Nutanix VertiIO ISO & Select the Driver as per Operating System Type. And click Ok
Select Nutanix VertiO SCSI Pass-through Controller and click next
Create Partition and click next to proceed with Windows Installation.
image011
image012
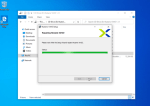
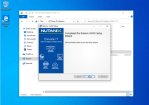
Once Windows Installation completed. Install VertiO Drivers.
Browse Mounted VertIO ISO and Run Setup.
image013
image014
image015
Click Finish
Enable Remote Desktop and RDP to Virtual Machine for Frame Agent Installation.
Note: RDP to VM is requried, as once you install Frame Agent, VNC Console connection will be disconnected
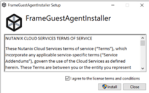
Copy Downloaded Frame Agent Installer to Virtual machines and Run it.
image016
image017
image018
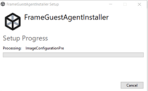
Click Restart to Restart the VM.
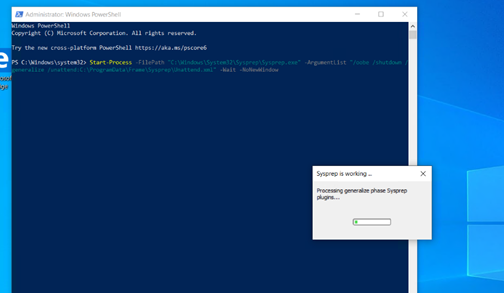
Once You done with Image configration, run the below Command from PowerShell as Administator
Virtual machine will be powered-off once Sysprep done.
Step 2: Prepare Nutanix Cluster
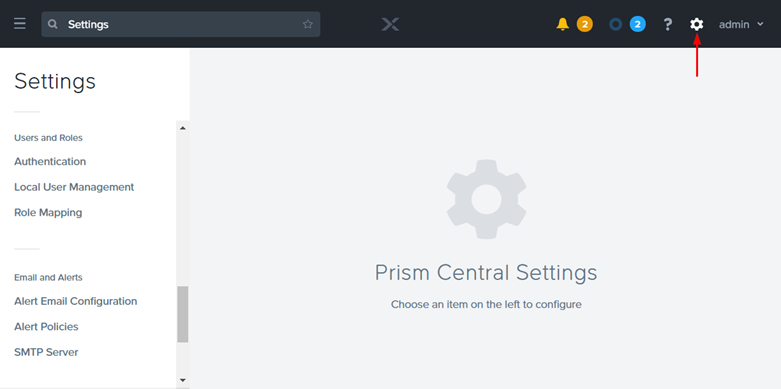
Open Nutanix Prism Central, open settings
Local user Management
Create new User: with prism Central admin & user admin permission.
Save your user name and password – you will need these later on in the process.
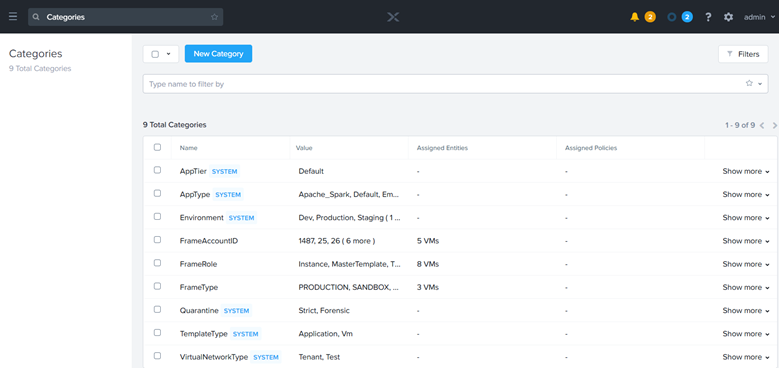
Click on the hamburger menu icon in the upper left portion of your Prism Central interface.
Expand the “Virtual Infrastructure” menu item and select “Categories.”
Click on the “New Category” button.
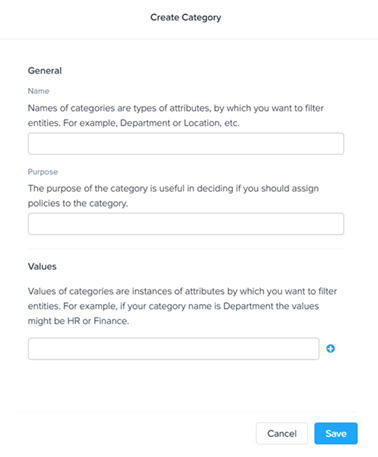
Fill in the form with the following values:
Name: FrameRole
Purpose: Create and Manage Frame Instances
Values: Instance, Template, and MasterTemplate (Add each value on separate lines using the plus symbol.)
Click “Save.”
From your home drop-down menu on the left, click “Settings.”
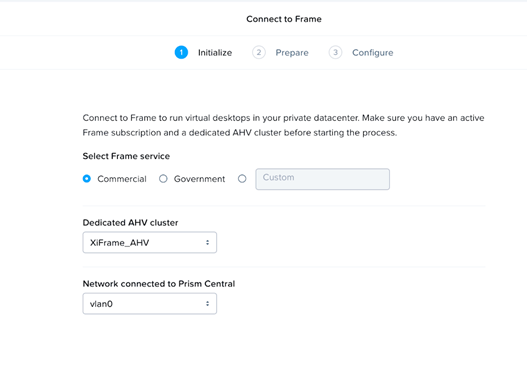
Under the “Setup” section of the “Settings” menu, click “Connect to Frame.”
On this page, specify the following:
Select Frame Service: This is your Frame Service deployment type. Most organizations should select “Commercial” unless using a Frame GovCloud deployment.
Dedicated AHV cluster: Select the cluster where the CCA would be deployed from the drop-down menu.
Network connected to Prism Central: Specify the VLAN that will be used by this CCA from the drop-down menu.
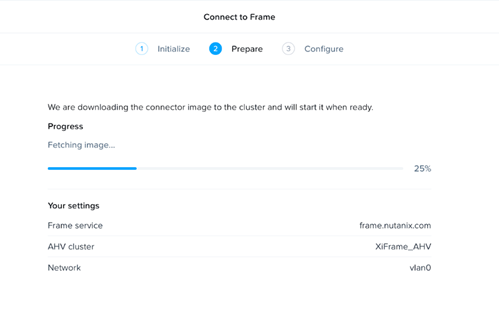
Click “Next.” The current image for CCA will be downloaded from Nutanix portal and deployed on the Nutanix cluster specified in the previous step. The progress can be monitored in the status bar. Once complete, click “Configure.”
Connect your AHV Cluster to Frame
Connecting your AHV cluster to Frame is the final task required to get Frame running on AHV.
NOTE: DHCP Is requried otherwise wizard will be stuck on 50% stage
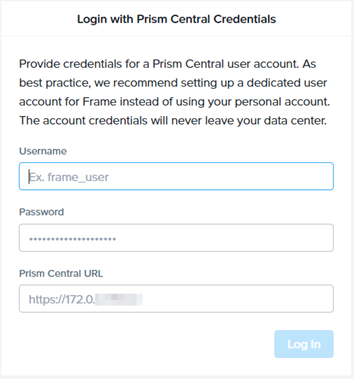
Access the Frame Cloud Connector wizard by navigating to the CCA’s IP. For example https://192.168.2.X.
Login with the Prism Central account you have designated for Xi Frame and enter the Prism Central URL.
Provide the Service Account(you created eariler in Pirsm Central) information and Prism Central IP Address and click Login.
Select your cluster and network VLAN to host desktops and enter your desired cloud account name.
Note: To ensure a smooth setup, please make sure you are logged into your “My Nutanix” account in a separate tab in your browser window.
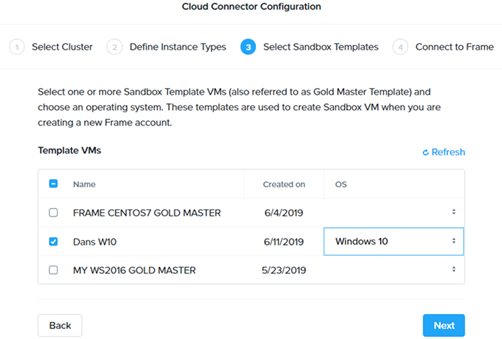
Define and add the VM instance types to use for your AHV-hosted Xi Frame account.
Check the box next to your golden master image VM template for the Sandbox template.
Click on the “OS” field listed next to your Sandbox template. Select your desired operating system. Click “Next” when you’re ready.
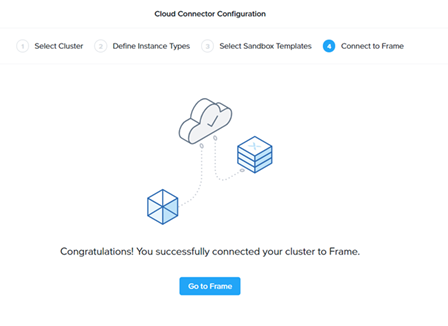
Select the Customer entity or Organization you created earlier in the Xi Frame account setup. Click “Finish.”
The wizard should inform you that your cluster has been connected successfully.
Note: Currently Configuration changes to cloud Connector appliance after its connects to Cluster is not possible, for changes need to contact Nutanix Support.
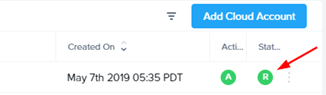
Log in to your Xi Frame account to check the cloud account creation status. The “C” status indicates that the account is still being created.
Note: If your account status hasn’t changed after an hour, please create a ticket through your MyNutanix support portal and provide your cloud account’s display name. You can locate the cloud account’s display name by navigating to the Organization or Customer entity’s “Cloud Accounts” tab.
The account status should change from “C” (Creating) to “R” (Ready).
Once the cloud account is ready, you can use your AHV infrastructure to create an account.
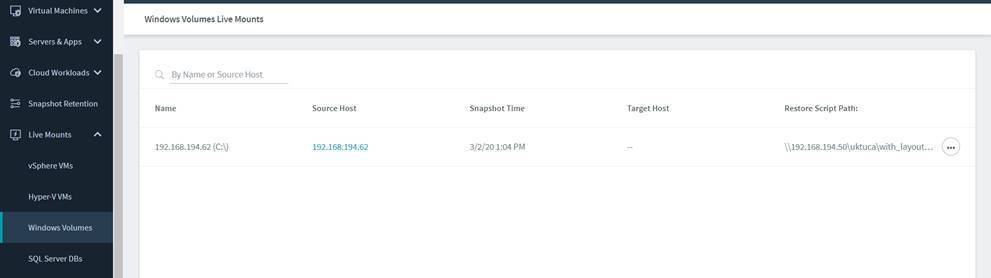
Below is the procedure to perform Rubrik BMR (Volume Restore) on Physical / Virtual. Before starting the restore details please upgrade the CDM 4.2 to latest available as from CDM5.0 there major changes and enhancements related to Windows Volume backup / BMR Restore.
Supported Operating System:
Windows Server 2012
Windows Server 2012 R2
Windows Server 2016
Windows Server 2019
Requirements:
Microsoft Windows PE Bootable CD required to initiate the Restore Process
I have created the WINPE ISO which can be used to initiate restore on VMware/Hyper-V VM, you can download it from below link.
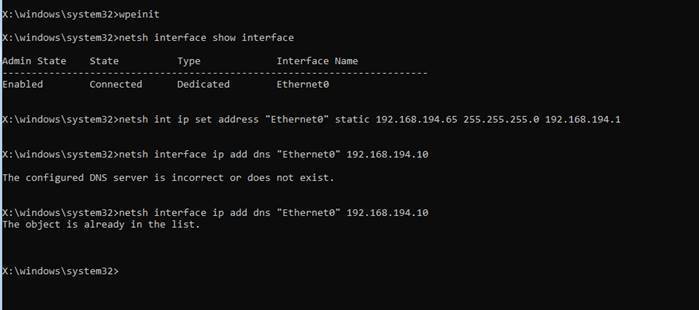
Set IP Address on booted VM incase if DHCP is not available , if DHCP is available please skip to next step. List all interface names netsh interface show interface Set Static IP netsh int ip set address “Ethernet0” static 192.168.194.65 255.255.255.0 192.168.194.1 Set DNS netsh interface ip add dns “Ethernet0” 192.168.194.10
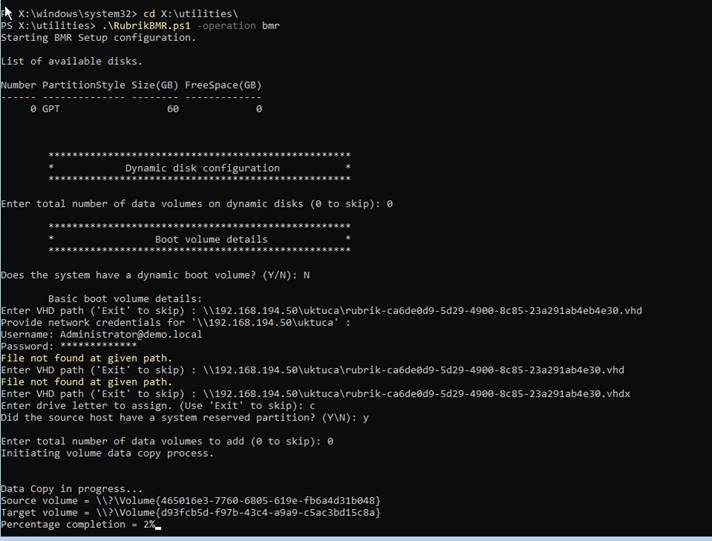
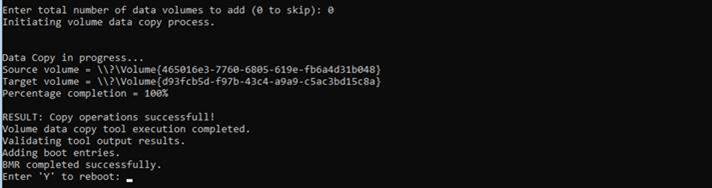
Browse to X:Utilities and run below command to start the BMR Restore script from Powershell and follow the Script steps. .RubrikBMR.ps1 -Operation bmr
Wait for restore finish, once 100% restore done. Press Y to reboot the PC
Once system is boot confirm, restored disks and reip the Server
Notes:
Local Admin Account password is required to logon on the restored System as you may not be able to use Domain Account for login
Customer WinPE may need to be created in case of Physical Restore with Proper RAID Controller Drivers.
Any Suggestions and Comments are Welcome, please share the feedback or comment if any.